At long last – June blooms. Now is the time to “Smell the Roses”. |
|
The Root of It newsletter ends with our monthly quotation. If you find your newsletter has been clipped by your email provider please click HERE for a webpage version of the newsletter. |
|
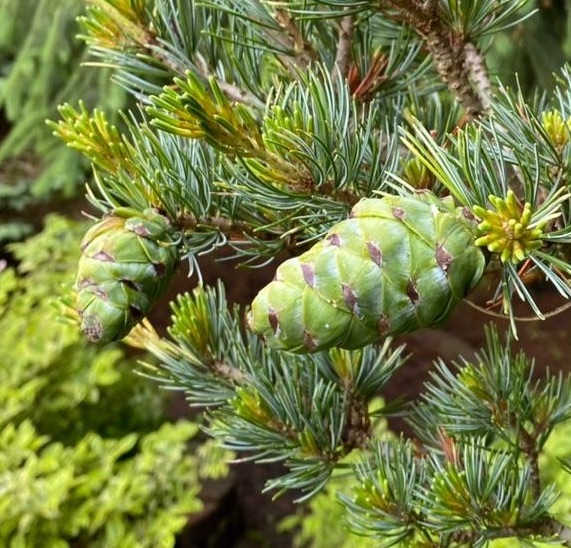
June is about flowers. Astilbes, coneflowers, roses, snapdragons, clematis---each day brings new beauties. Their colors pop in front of the greens of pines, spruces, arborvitae and other conifers that give structure to our landscapes. But why no flowers on conifers?
Conifers belong to a group (a "class") of plants called gymnosperms, which dominated the landscape during the time of dinosaurs, long before the flower-bearing angiosperms*, and reproduce via cones. Being wind pollinated, they have no need for colorful flowers to attract pollinators. The male and female reproductive parts are born on separate cones, with the male cones typically much smaller than the female, and separated on the tree to prevent self-pollination.
|
|
|
Gymnosperms are distinguished by bearing naked seeds (Greek gymnos=naked, sperma=seed), seeds that are not surrounded by an ovary as are the seeds of flowering plants. The rigid, closed scales on conifer cones provide protection. When the cone dries out and the weather is favorable, the scales open and the tiny seeds, usually two atop each scale, fall. Unlike angiosperms, which complete their reproductive cycle in one year, gymnosperms are typically slow to reproduce. Fertilization alone may take up to a year. Cones can remain on the tree for long periods. Norway and white spruce keep their cones for two years, and some pines keep their cones for ten years. The Jack Pine requires fire for its cones to open and has been known to keep them a whopping 80 years. Conifer cone production can be erratic and include years with few or no cones and mast years in which copious amounts are produced.
There is wonderful variety in the shape of cones, which can range in size from one tenth of an inch to two feet in length! This is the time of year (early summer) when most cones begin to form, and is the ideal time to scout for these tiny structures and then watch them develop through the coming months and years. Look Around.
* Earlier still in the evolutionary calendar we see the dominance of more primitive spore-producing plants such as ferns, which require moisture as a transportation mode for their spores. These beauties are older than dirt----well, almost.
K Edgington
|
|
Gomphrena haageana 'Strawberry Fields'
photo by K Edgington
|
|
"Sooner or later, everything old is new again." I don't think Stephen King was referring to flowers when he wrote that line but he could have been. With globe amaranth, commonly known as gomphrena, it certainly holds true. A favorite of old-fashioned cottage gardens, gomphrena has been grown in ornamental gardens in Central and South America for centuries. It eventually found its way to Colonial Virginia, including Thomas Jefferson’s Monticello, where it is still on display today. Rediscovered by hybridizers in the 1990s, we now have lots of new, well-performing gomphrenas with great color variation.
Gomphrena is one of 90 related species belonging to the Amaranth family with Gomphrena globosa being the most common. The flower heads resemble clover flowers and are not showy individually, but their masses make quite an impact. Mostly in the pink, rose, and magenta color family, other cultivars,
|
|
including gomphrena haageana, veer into orange and red color tones. An annual in our area, it needs full sun and well-drained soil.
This versatile plant checks a lot of boxes for the gardener wanting fuss-free, long-lasting color. While typically grown at the front of the border, some varieties reach 2+ feet tall and fill in the mid-range. Because of its drought tolerance, gomphrena adapts nicely to containers. The blooms make great cut flowers and are easily dried for flower arrangements, potpourri, or any other crafty uses. Where it really shines is in the fall garden. When many annuals get leggy and fade, gomphrena comes on strong in the August heat. (Legend has it that gomphrena was originally planted at the Gates of Hades.) It keeps going strong until frost, and its colors mesh well with mums and other fall favorites. Did I mention that bees and butterflies love it and the deer don’t?
It's not too late to plant gomphrena to fill in gaps in your annual beds. Truth be told, it doesn’t do much until the heat of summer and is susceptible to mold, mildew, and fungus if planted too early. Growing from seed requires some patience with germination taking 2-4 weeks, so garden center plants may be your best bet. You may not have noticed them when shopping for annuals because they have yet to ‘take off’ with blooms. Occasional dead-heading will keep things popping.
Some interesting cultivars to look out for include 'Strawberry Fields' (G. haageana type) that produce large red blossoms on a 20” plant. This first true red gomphrena is a prolific bloomer. A dwarf variety, The Buddy Series, is less than 12 inches tall in intense purple, rose, and even white varieties. The QIS Series has a wide range of colors and are great as cut flowers because of the long-lasting cut blooms. Its 1½ inch blooms make a statement in the garden.
That hot dry patch in your garden where you have difficulty finding something to grow just might be the perfect spot for gomphrena. Whatever your style or color scheme, a well-behaved plant is always welcome!
J Gramlich
|
|
Propagation from Softwood Cuttings |
|
Repetition is considered an essential design element and is relied upon in notable gardens worldwide. Most of us don't have the operating budgets of these fabulous models, but there's an alternate method of duplicating our favorite plants. Let’s review some best practices for propagation from softwood cuttings.
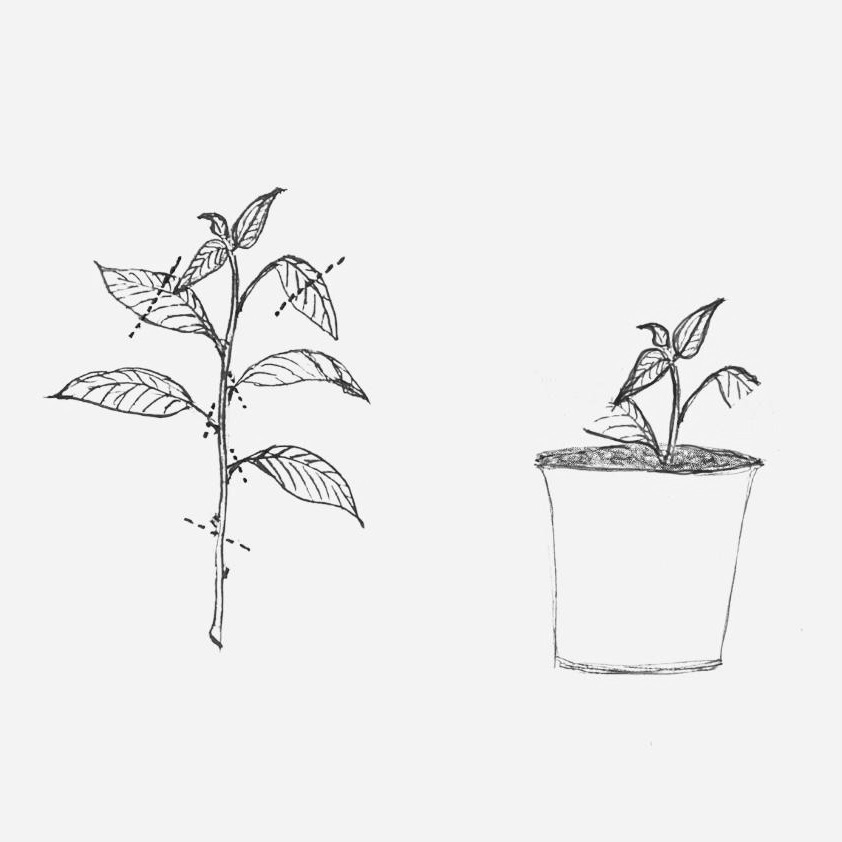
Many perennials and shrubs (lilac, honeysuckle, hydrangea, shrub roses and elderberry) can be easily propagated at this time of year. Softwood is the flexible portion of a stem between the branch tip and where last year's more rigid growth first appears. The ideal time to take cuttings is just before flowering, when a plant’s growth hormones are the most plentiful and potent. However, if your candidate for propagation has already flowered, don’t worry!
|
|
|
The overall success rate may decline slightly after blooming, but you can simply increase the number of cuttings you take.
Follow these steps to get started
- When possible, take cuttings in the morning while vegetation is fully hydrated. If you cannot get them into soil immediately, gather cuttings in a plastic bag with a splash of water or a damp paper towel to ensure hydration.
- Select approximately a 6” shoot, cutting above a leaf on the parent plant using sharp, clean clippers.
- Trim to just below a leaf node and remove the leaves from the lower third of the stem.
- For large leaf specimens, reduce the remaining leaves to half, cutting off the tip end. This minimizes the amount of water required to sustain the cutting while still allowing photosynthesis to occur.
- Dip the cutting into rooting hormone.
- Fill a pot with pre-moistened, soilless medium and use a pencil or dowel to make a hole so that the hormone remains on the stem during insertion. Gently press the soil around the cutting stem. Depending on the container size, you may use several cuttings per pot.
- Direct a few drops of water to the base of the stem.
- Label and cover the pot loosely with a plastic bag.
- Place in a bright area being careful to avoid direct sunlight.
Keep an eye on the little fellas and exercise patience. If condensation gets heavy inside the bag, simply lift it off for a few moments to reduce the humidity, then return it. Check the soil’s moisture and add water with a spray bottle as needed. After about 4-6 weeks you can try a gentle tug test to see if you are met with any resistance. If so, you have roots! After several additional weeks of root development your new plant is ready to be scooped out and repotted into its own container.
Congratulations! Now go forth and create repetition of color, texture, and size to your heart’s content!
E Barth-Elias
|
|
Creature Feature - Ants in Your..... |
|
Honestly, I find ants a bit creepy and crawly. And their tendency to appear unexpectedly in places where I do not want them (like my kitchen) is…stressful. So when my dear Editor suggested I write about them I was not enthusiastic — but as usual, she was right. Ants are fascinating (in a creepy kind of way).
Ants are the stars of numerous horror movies, which makes sense because they have incredible and somewhat terrifying abilities. Ants co-existed with dinosaurs, but who survived? Think about that. Antartica is the only continent that doesn’t contain members of the family Formicidae, but they are everywhere else – an estimated 1.5 million ants to every human. (If you are prone to nightmares, don’t think about that!) There are at least 12,000 identified species of ants, and probably thousands more. About 700 species live in North America, with 128 in Ohio, including formica, carpenter and fire ants. Ants are the longest-living insect — one species of queen has a 30-year lifespan and can have millions of babies. Ants are remarkably strong. An ant can lift 20-50 times its own weight, the human equivalent of a 200-pound man lifting a 2-ton car. Ants can even walk on water, as Sir David Attenborough attests HERE.
Ants have a head, thorax and abdomen, and bent antennae that are used to touch, taste and smell. An ant’s mandibles, located on either side of its mouth, carry, dig, and fight. Equally interesting is what ants don’t have. Lungless, they “breathe” with tiny holes on their body through which oxygen enters and carbon dioxide exits. They also lack ears, and “hear” using their feet to feel vibrations in the ground. Ants mainly communicate by releasing a chemical trail, called pheromones, to lead other ants to food (which explains the line of ants marching towards your sandwich) and warn of danger, but they can also communicate by rubbing body parts together. Listen HERE.
Ants’ amazing individual skills are maximized by their highly social nature and ability to work together in organized, structured colonies called formicaries. These nests may be located underground, at ground level or in trees. In this rigidly hierarchical society (there is zero upward mobility), the males’ sole job is to mate with the queen, then die. The queen never mates again, but once is enough for her to fertilize eggs for the rest of her life. The queen determines the sex of her offspring by fertilization — fertilized eggs become female workers (larger ones are soldier ants), unfertilized eggs become males who, I repeat, only exist to mate with new queens and play video games (just kidding about the video games.)
Ants go through complete metamorphosis – egg, larva, pupa, adult. Baby queens, aptly named princesses, develop due to better nourishment of the larvae, but there may also be a genetic factor. A colony may have one queen or many. One colony discovered in Argentina in 2000 was 3,700 miles wide, with millions of nests and a truly unimaginable number of ants.
Female worker ants basically do everything (no surprise there!) — caring and providing for the queen, the nest and the babies. LISTEN to a famous “ant keeper” describe the workings of an ant colony as he makes the case that ants are better pets than dogs or cats. (I wasn’t convinced.) Anybody have an Uncle Milton’s Ant Farm? Over 20 million were sold.
Ants eat other insects, seeds or fungus. Interestingly, some ants have a symbiotic relationship with aphids, protecting them from predators in exchange for their honeydew. These ants may even house aphids in their nest (like a tiny cow), providing food and shelter in exchange for the sweet “milk”.
Army ants (the term includes about 200 species of ants that use predatory groupings), will eat reptiles, birds or small mammals. These terrifying creatures’ hunting raids are collective foraging at its best. Watch this iconic CLIP from “Indiana Jones”: The ants move like one creature, dissolving and digesting their prey as they attack it. Ugh. Because they eat everything around them, they keep moving in search of new food. Most prey can’t outrun them, so their only chance is to remain still and hope the nearly-blind ants won’t spot them. Not a fun strategy.
Yep, ants can be brutal. Soldier ants act like, well, soldiers, defending their queen and killing prey. They attack other colonies for food or territory, usually fighting to the death. Ants will even take eggs of a conquered colony home to their own nests and raise the babies as slaves. This ARTICLE suggests interesting parallels between ant and human warfare. You probably know about the fire ant’s painful sting, but did you know carpenter ants bite then spray the wound with acid to create a burning sensation? Yikes!
So why shouldn’t we stomp out ants? Because they are an incredibly important part of our ecosystem, and have an enormously positive impact on our environment. It is thought ants equal or best earthworms in the amount of soil aerated as they tunnel and dig their nests. Ants eat insects that eat our lawns and gardens. As they gather food, ants serve as pollinators and seed dispersers. They clean up dead insect carcasses and help decompose plant and animal matter, fertilizing the soil and recycling nutrients. And finally, ants serve as an important food source for insects, birds and mammals. So while ants are creepy, crawly and NOT welcome at a picnic, they are also industrious, essential, and actually quite awesome.
If you haven’t had enough of ants, watch THIS.
If you have an ant problem, read THIS from OSU's Ohioline!
C Christian
|
|
Lace is hard to hate. We look at the detailed handwork that produces holes and patterns, admiring the skill that created it. Most of the time.
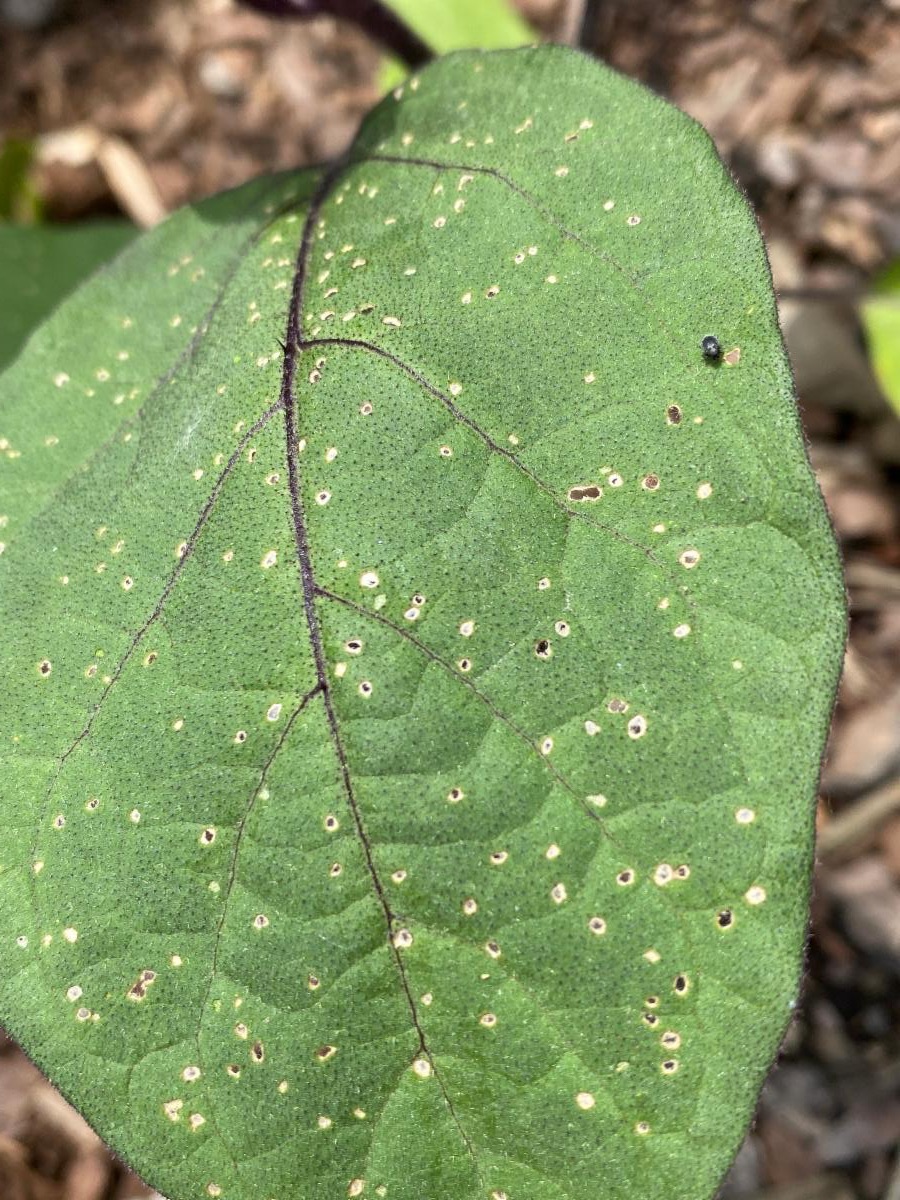
There is a lace we dread – in our gardens. When we see tiny scattershot holes in our growing vegetables we know flea beetles have arrived. These pests live up to their name. They are tiny – 1/16” to 1/5” – and leap away when disturbed.
Most flea beetles are host-specific members of the family Chrysomelidae. Some focus on cruciferous crops (broccoli, cabbage and such), others on the nightshade family (tomatoes, peppers and their relatives), some on spinach or beets. Damage on established plants is mostly aesthetic, producing unsightly tiny holes but rarely doing significant harm. In very young plants, particularly seedlings, flea beetles can be deadly. They are vectors for several plant diseases, particularly bacterial wilt.
|
|
Flea beetle making lace on an eggplant leaf
photo by E Barth-Elias
Editor's note: Imagine the delight when flea beetles were discovered on the eggplants! Newsletter writing can make for different garden priorities.
|
|
Flea beetles overwinter as adults and emerge in the spring when their host plants begin to produce foliage. When the eggs hatch, the larvae feed on roots, pupate and emerge as adults in 10-14 days. Most species are black or dark brown, although some have an iridescent cast or are striped. Most adults feed and deposit eggs in the soil to repeat the life cycle. They have one to three generations per season, depending on the species.
Integrated Pest Management is the best approach to prevent the worst of the damage. Cultural controls include avoiding planting too early, when seedlings are more vulnerable to feeding damage and diseases. Floating row covers deployed before flea beetles emerge can prevent much adult damage. Because flea beetles are deterred by water, water mid-day. The most effective control is to rotate crops each season, replacing the host plant with one that is not susceptible.
Panic isn’t warranted when those lacy leaves appear. By then it’s too late for that season’s crops. With preparation, you can make sure future crops don’t begin to look like Aunt Cora’s tablecloth.
S Vradenburg
|
|
A Hand Dipped Summer Treat
How can someone who loves all things green get such satisfaction and enjoyment from mixing a wheelbarrow full of cement? Steppingstones, edgers, hypertufa pots, and leaf castings are some of the garden ornaments that have come from my wheelbarrow. I’m not alone in this – most garden clubs have dabbled in cement projects, and cement companies are quite used to gardeners coming in for a bit of this or that. Working with cement is great fun with lasting results.
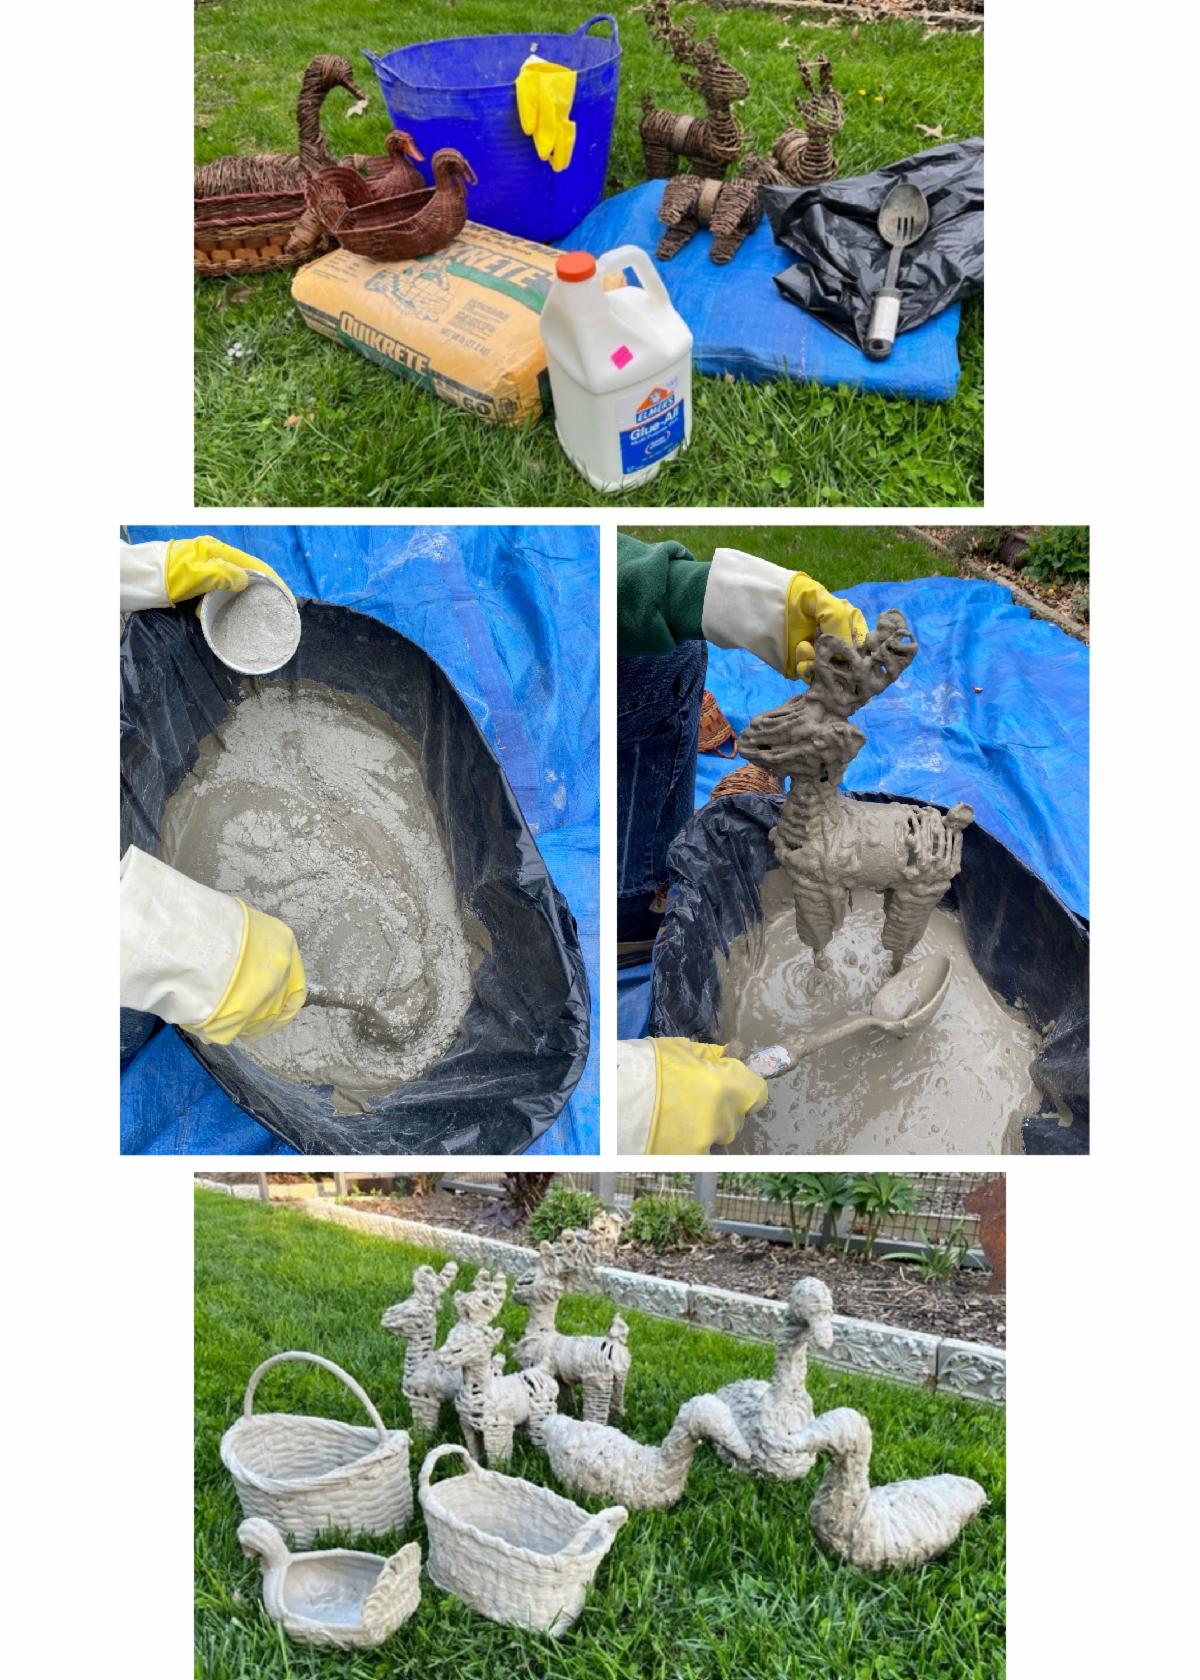
Here’s a different take on garden cement work – cement baskets and animals. The project requires few tools and ingredients and can be competed in a half day (minus the sealing). Shopping the thrift stores or seasonal sales yields wicker and grapevine baskets in many shapes, as well as figures such as ducks, elephants, bunnies, and deer. Small to medium objects work best because of the limitations of your mixing container.
|
|
TOOLS
- Tarp or covering for the work area floor
- Large trug or similar low container
- Latex or similar waterproof gloves
- Large spoon or stirring implement
- Trash bag
- Mask (Recommended when working with dry cement.)
INGREDIENTS
- Elmer’s Glue-All or similar white glue
- Water
- Mortar mix
- Concrete dye (optional)*
- Baskets or any small wicker, grapevine, or similar woody object
- Water sealer such as Thompson’s
|
|
|
Amounts: I gallon of glue and 1 60# bag of mortar mix will make approximately 16 small to medium projects (baskets, animals, etc.)
*Using a small amount of concrete or cement dye can make your project look more like stone than concrete. These dyes come in liquid and powder form, and are added to the water/glue mixture before mixing in the cement. Using a small amount of buff colored dye turns the project from a cement grey color to a light beige stone color.
INSTRUCTIONS
- Spread a tarp on the floor of a flat work area.
- Line the trug or mixing container with the trash bag. This is not a necessity, but simplifies clean-up.
- Pour the glue into the bottom of the lined trug, and use the glue container to measure an equal amount of water. Pour the water in with the glue and mixing.
- If using cement dye, mix it in with the glue and water.
- Add cement, a couple of cups at a time, to the glue mixture, stirring after each addition until the mix is smooth, pressing out lumps. This can take some time---adding a 60# bag of cement took about a half hour. When the mixture is the consistency of a soft toothpaste – not runny and slightly holding its shape – it is ready for dipping.
- Dip each object into the mortar mix mixture, turning to cover each side. Let the excess drip into the trug and then place the object on the tarp to dry. Use your stirring spoon to dribble a small amount of the mix onto any spots that might be bare from handling. Cover your leftover mix with plastic and save until step 7 is complete.
- Let the project dry for 4-6 hours or until the top part is dry (it will turn a lighter color), and then use a gloved hand to pick it up and smooth the bottom where it met the tarp. Use your leftover mix to make minor repairs or fill in spots. Put the projects in a shady site to dry for 48 hours.
- When completely dry, seal with a water sealer such as Thompson’s.
There you have it---a hand-dipped summer treat that won’t melt when the temperatures rise.
|
|
photos by K Edgington
K Edgington
|
|
June Checklist
- Prune spring-blooming shrubs and trees such as lilacs, crabapples, forsythia, and viburnum before their blooms are set for next year.
- Divide and clean up spring bulbs and foliage. Mark their location and fill in any bare areas.
- Trim suckers off tomato plants and provide support with frames or cages.
- Replant lettuce, radishes, beans, etc. to guarantee a succession of harvests throughout the summer.
-
Be on alert for diseases and insects such as black spot, mildew, rust, beetles, aphids, cutworms, hornworms, slugs, snails, and scale. PEST AND DISEASE MANAGEMENT Grow Pittsburgh
- Enjoy your garden indoors by cutting fresh flowers in the morning and immediately putting them in water.
J Gramlich
|
|
To learn more please check out these programs :
Meet Me in the Garden Series. Offered in-person at Summit Metro Parks Nature Realm auditorium. Registration required.
-
The Magic and Lore of Heirloom Plants and Their Role in Our Modern Gardens with Brian Gregory, Senior Horticulturalist with Stan Hywet Hall & Gardens on Wednesday, June 22nd at 7:00 pm.
-
Maximize Your Garden's Blooming Season with Karen Martin, Perennial Manager at Dayton Nurseries and Garden Center on Wednesday, July 27th at 7:00 pm.
Learn more about and register for these programs on our website (link below).
_____________________________
IT'S BACK and Time to Buy Tickets!
The Summit County Master Gardener Tour of Gardens
including our "must-visit" Posie Shoppe
Mark Your Calendar For
Saturday, June 25th, from 9:00 a.m. through 4:00 pm
General admission tickets are $25. Sponsored tickets at various levels
include a catered pre-tour breakfast and early access to the Posie Shoppe.
Tickets must be purchased in advance and are available at these sites: Dayton Nurseries, Suncrest Gardens, Graf's Garden Shop, The Bird Store and More in Fairlawn, and on the Summit County Master Gardener website.
Visit our website for further details and updates.
|
|
More learning opportunities:
|
|
In June as many as a dozen species may burst their buds on a single day. No man can heed all of these anniversaries; no man can ignore all of them.
Aldo Leopold, Prairie Birthday
|
|
We invite you to share The Root of It with your gardening friends and family. If you would like to subscribe to our mailing list please visit our website, scroll to the bottom, and follow the link under Join our email list. |
|
The Root of It staff: Karen Edgington (Editor), Emma Barth-Elias (Photo Editor), Carolyn Christian, Jennifer Gramlich, Sarah Vradenburg, and Geoff Kennedy (Technical Advisor)
|
|
We Would Like your Feedback
Contact us at: newsletterscmg@gmail.com
To discontinue receiving this newsletter please click on the UPDATE YOUR PROFILE link below. You may then choose what types of information you would like to receive from us.
|
|
|
|
|
|
|