SAL13 - Isn't 5" Enough?

Dear Ruthanna,

Introduction


This is the thirteenth in the series of emails based on Ruth Grihalva's April Power Point presentation to the String-A-Long Quilt Guild in Porter County Indiana. The title was "Piecing Hints, Tips & Longarming Issues."


Her comments are based on our experience with over 10,000 longarmed quilts in our 20 year history. Additionally, Ruth has published over 160 patterns, three books, and two tools under the nom de plume of "Raggedy Ruth Designs."


However, these newsletters are written by me, her husband,Rick. I am writing these from Ruth's presentation notes. Nonetheless, I will be sprinkling my ideas in, also.

SAL13 - Isn't 5" Enough?


Intro -


In this newsletter we will discuss the dimensions of a properly sized back. In the previous newsletters, we have been examining some of the other aspects of determining proper dimensions.


At Forever In Stitches we request that the back be 5" larger than the top on every side. That odd size has been reached via much experience. So, now that I've got your curiosity, lets dive in and find out what were the factors that caused us to settled on 5".


Discussion -

The quilt layout illustration, shown here, was created by Ruth to explain the relative size differences that we have established. In it, the white represents the top. The pink represents the batting While the blue represents the back.


On the top we indicate how much each layer is as compared to the next higher level, all the way around. On the bottom, we give the total size of that layer as compared to the top's total size.


That is a neat graphic, but why the differences? one might ask. There are several reasons for coming up with these measurements. The origins are:


  • Things that are related to the structure of longarming;
  • Things that quilters do; and,
  • Things that are caused by the very nature of fabrics and battings.

Structure Of Longarming-


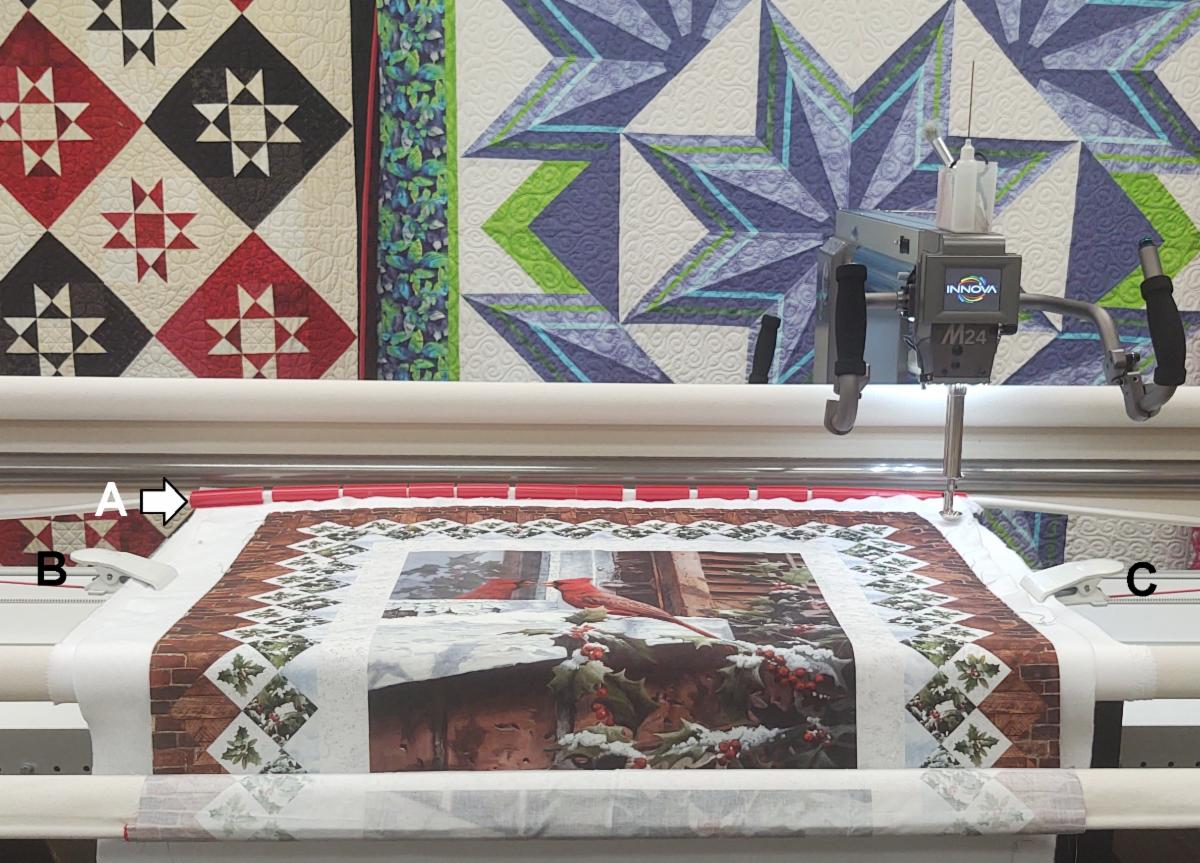
Shown here is a "sandwich" [top, batting, and backing combination] that has been loaded onto one of our Innova longarms. At the top, just under the roller bars, note the sections of Red Snappers [labeled "A" in white]


The mechanism [whether it is pinning, Red Snappers, or a host of other mechanisms] that is used to attach the sandwich to the leader cloth requires the use of backing fabric that goes well beyond the size of the quilt top.


Likewise, there are connection mechanisms on the right and left sides [labeled "C" and "B" in black, respectively]. Similarly to the mechanisms at the top, there are many techniques and gadgets used to keep the sandwich taut, from side-to-side.


So, you look at all that space above and below the clamps and wonder why can't that be used? Well, then, let's continue our journey.


Things That Quilters Do -


Often quilters test the tension of their set-up using the piecer's backing and batting on the edge of the sandwich, with a piece of their standard quilting fabric on top. We do a tight meander [jig-saw puzzle-like] pattern that shows us the tension on the straights, in all four directions, as well as the right and left curves.


The other thing that quilters often do in Edge-To-Edge [E2E] quilting is use patterns that fit together when the alternate rows are off-set by 1/2 of the pattern's repeat. This means that half of a pattern must go past the edge of the quilt, taking the space of half of the pattern. This is not an issue at Forever In Stitches as our Innovas will automatically trim off the extra stitching. It is, however, an issue with other machines and older software.


The third thing that quilters do in E2E quilts, is to stitch "off the edge" of the quilt top so that the connection stitches between rows is not stitched on the quilt top. The amount of stitching off the edge is highly affected by the squareness of the quilts.


At first this may seem counter-intuitive. Aren't most quilts rectangles or squares? That may have been the original design for the quilt, but by the time the top is brought in for longarming, it is often a different story.


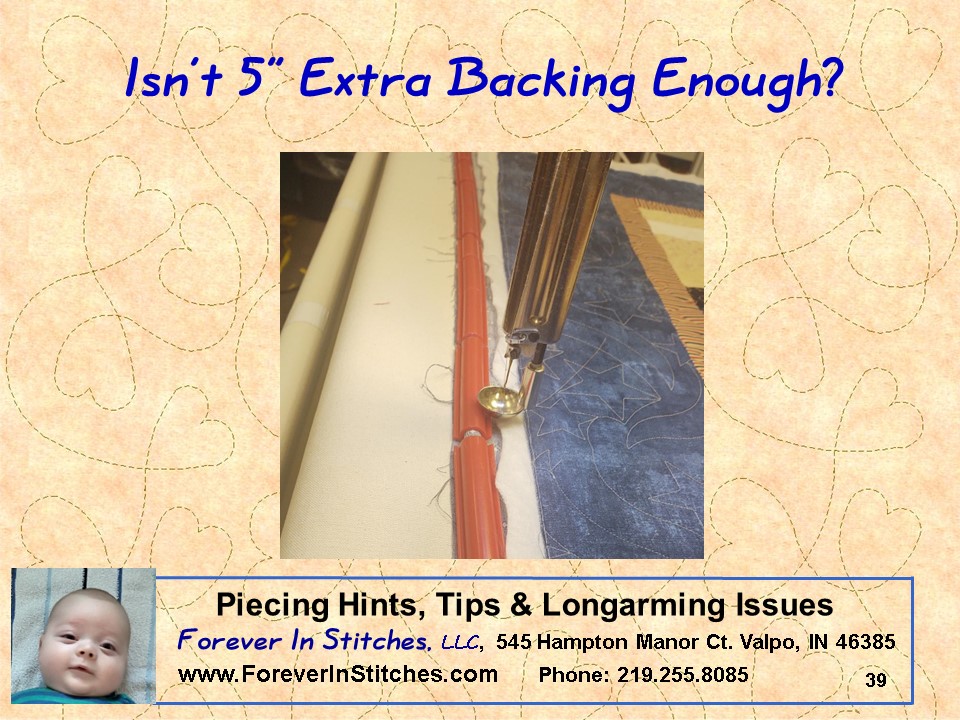
Many quilts are parallelograms - four sides, all of which are parallel, but the corners are not 90 degrees. Thus, when the top is aligned with the rollers at the top, by the time it gets to the bottom, then the top has drifted either to the right or to the left. There have been times when the "drifting" has gone beyond the backing. Thus, we must have adequate backing.


There are also situations where the top and bottom are parallel, and the corners are 90 degrees, but the center "bulges", similar to the shape of a hurricane lantern. So, we must have adequate backing and batting to allow for this.


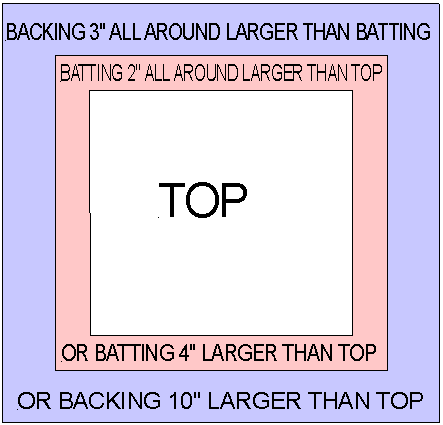
So, obviously, the back and batting must be wider than the top. And, the extent of these factors often cannot be determined until the quilt is mounted on the longarm machine. Therefore, have adequate batting to begin with.


Things Caused By The Nature Of Batting And Fabric -


This really is a combination of "Materials" and "The Nature Of Longarming.". That is because as one rolls the quilt up, and onto the "take-up bar," each of the three layers travels a different distance. The top, on the inside of the "roll" travels the least. The batting, in the middle, travels slightly further, by the width of the top fabric. However, it is a different story with the back.

The back "travels" further, due to the thickness of the batting, which is beneath the thin quilt top, but on top of the back. The thicker the batting and the higher the loft, the more the back fabric travels because its distance around the roller is longer. The result is that what appeared to be an adequate sized back, is now inadequate. This is shown in illustration #39, in which the back started out being 5" larger, but ended up as being inadequate.


Thus, sometimes, after stitching, the back ends up not being as long as the other two layers. We refer to this phenomenon as "the quilt 'eating' the back." This effect can even be affected by the density of the stitching!


What can we do? If the piecer has additional backing fabric, we can attach it to the bottom. If not, ... well, I can't think of an appropriate word for our newsletter to describe the situation. The solution is to either add more fabric to the back, matching or otherwise, or trimming off some of the borders.


For those of you who like their batting fluffy and lofty, that means that you should make sure your back is even larger than what your longarmers states as the normal additional size required for backs.


So, now you know why we request and extra 5" all the way around, and why that may not even be large enough.

What's Next?


The next email in the series will be titled "SAL14 - Piecing Your Backing!"

If you would like to have Ruth give a presentation or workgroup to your organization, please let me know by email to RickG@ForeverInStitches.com [with your complete contact information, please] or by phone me at 567.208.3572, my mobile.

At Forever In Stitches, you know it will be good!


Al Fin


I trust that this was of assistance or interest. If you have any questions that need to be answered, on this or other longarming or quilting topics, then please write to me at RickG@ForeverInStitches.com or call me directly at 219.255.8085.


Thank you for your time and interest.

May The Lord Richly Bless You!
Rick & Ruth Grihalva
Join Our FREE Email Mailing List
At Forever In Stitches our goal is to further the art of quilting and longarming.
 
We thank you for your interest in our newsletters. We try to keep our newsletters informative, instructive, and enlightening, in addition to informing you of specials. Please join our private mailing list! Remember to forward applicable newsletters to friends who may benefit from the information contained in them!
 
Please note that a history of our newsletters, since the second quarter of 2022, can be found on our web-site: ForeverInStitches.com.
Forever In Stitches, LLC
Perfect Corner Ruler
Raggedy Ruth Designs
Facebook