We wrap up the year with thoughts about trees, the last article in our design series, and a little bit of holiday bling. Look for the Root on a new day next year, as we switch to a 1st of the month publication date. See you on January 1st! |
|
The Root of It newsletter ends with our monthly quotation. If you find your newsletter has been clipped by your email provider please click HERE for a webpage version of the newsletter. |
|
I admire folks who can identify trees in winter. Leaves, those handy ID tools, are long gone, and other clues must be used to ferret out identities. Perhaps there’s an acorn left on the ground. An oak! Perhaps the bark is peeling off in sheets. A shagbark hickory! Or perhaps the bark has a rich cinnamon color AND is peeling off. A paperbark maple! Winter tree identification can be difficult without obvious clues. A good place to start is with the stem and branch arrangement. Does the tree have alternate, opposite, or whorled leaf and branch connections?
Opposite leaves or branches emerge on opposing sides of one growing point, or node (the area where leaf, stem, or flower buds are attached). Alternate branching leaves and leaf scars do not appear directly across from each other, but alternate down the stem. Whorled arrangements have three or more leaves or branches emerging from one node. Most tree branches are arranged alternately, with far fewer displaying opposite growth and a very few whose branches are whorled.
|
|
The alternate branching of a cherry tree (left) compared to an oppositely branched maple (right)
photo by E Barth-Elias
|
|
There are pneumonic tools to help remember the trees with opposite arrangement. The phrase MADCapHorse is a reminder that Maples, Ash, Dogwood, the Caprifoliaceae family (the honeysuckle family, which includes plants such as viburnums), and Horse chestnut and their relatives, such as Ohio’s Buckeyes, all have opposite leaf and branch arrangements.
Wondering what that tree is on your winter walk? Look for tell-tale spent leaves, fruits, thorns, and seeds. Identify the stem and branch arrangement to quickly eliminate common trees, such as maple, from consideration. It's helpful to look for stems and branches that are towards the edges and newer to the tree, since missing limbs and branches can mislead. Become familiar with other characteristics, such as bark patterns (beech bark is smooth and grey, while dogwood bark is blocky and alligator-like), bud shape and size (sharply pointed oak buds are clustered at the end of the twig), leaf scars (horse chestnuts have large, horseshoe-shaped leaf scars under their buds), and branch silhouette (black locust trees have zig-zagged, disorderly branching). Take along a winter tree key or pull one up on your phone and go through the series of questions that will take you to the tree’s identity. Learn to know those trees on familiar paths, and watch them through the seasons. Look Around!
K Edgington
|
|
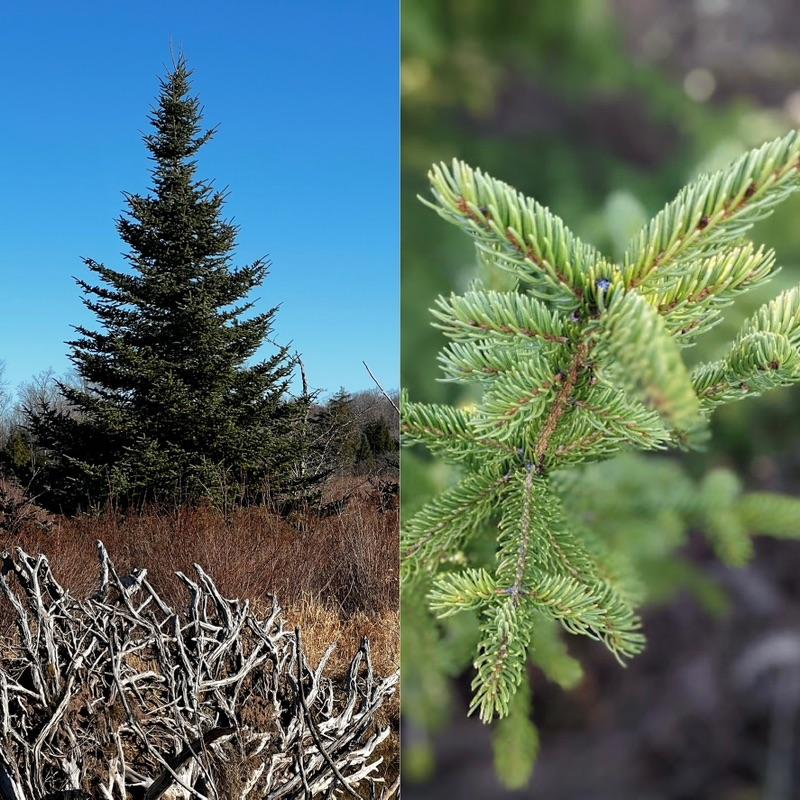
Abies balsamea var. phanerolepis photos by J Gramlich
|
|
When it comes to holiday decorating, for many, the star of the show is the Christmas tree. The choice of decoration is endless but there are also quite a few choices for the tree itself. Many prefer the fragrance and sturdy branches of the Frasier or Douglas fir, while others like the filled-in look of Scotch or white pine. Cypress and spruce options are also on the table. One you may not have heard about is the Canaan Fir, originally discovered in West Virginia but gaining ground at tree farms through Ohio. |
|
The Canaan Fir (pronounced ‘ken-AIN’) is native to the picturesque Canaan Valley in West Virginia. Situated in the Allegheny mountains north of Elkins, it is the highest valley east of the Mississippi at 3200 feet above sea level. With mountains on either side, the elevation can top 4400 feet. Before the ice age, this area was part of a continuous stretch of fir trees up the Appalachians to Canada. As the weather warmed, only this pocket of firs remained and adapted to the local climate as it tolerated wet soil (much of the valley is bog) and low temperatures. It shares many characteristics with balsam and fir trees, but is now considered a special variety of balsam fir, taxonomically known as Abies balsamea var. phanerolepis.
What makes the Canaan fir so special? It has an alluring, relatively dense, pyramidal shape with a slender tip that gives it a traditional look. The foliage color is dark green with a slightly bluish-green tint, a silver sheen on the underside of the needles, and a mild fragrance. More lateral limbs result in a denser tree and it has fantastic needle retention, a big plus for anyone who hates vacuuming tree debris!
Relatively new to the commercial tree market, the Canaan fir is being grown right here in Ohio. Canaan fir tends to break bud later in the spring, making it less likely to be damaged by a late frost. As stock multiplies, you should see more on Christmas tree lots, but it does have other uses.
In its natural habitat, the Canaan fir will grow to 40-55 feet in height and 20-25 feet in width. It will tolerate a variety of soil conditions and does well in cold climates (hardiness zones 4-7). While a lovely accent plant in a rain garden, meadow, or naturalized area, a grouping makes an excellent windbreak. Propagation is from seed harvested from seed orchards or directly from the source in West Virginia. Balled and burlapped trees can be planted in the spring or fall.
Unfortunately, the Canaan fir is vulnerable in the wild due to deer overpopulation and the invasive balsam wooly adelgid, so its propagation by tree growers is welcomed. While Scotch pine suffers from disease and insect problems and Frasier firs can be finicky to grow, the Canaan fir just might be the ticket. It has survived tough conditions for eons and has shown its adaptability to harsh winters, floods, and high wind conditions. Good luck to this resourceful tree with the can-do spirit. Coming soon to a nursery or lot near you!
J Gramlich
|
|
Few trees nearly beg to be petted more than the beech. Its smooth bark invites visitors to stroke. Wrinkles seem to appear where limbs join the trunk. Unfortunately, that smoothness offers hard-to-resist opportunities for young lovers to memorialize their love by carving. Beeches are easy to spot in the winter because their leaves remain on the branches for months after others have shed theirs.
American Beech (Fagus grandifolia) is an important part of North American hardwood forests. It is found from Texas northeast to Maine and Canada. Its nutritious, oil-rich nuts are an important food source for forest-dwelling wildlife and its branches provide habitat for more than 40 species of birds and mammals.
|
|
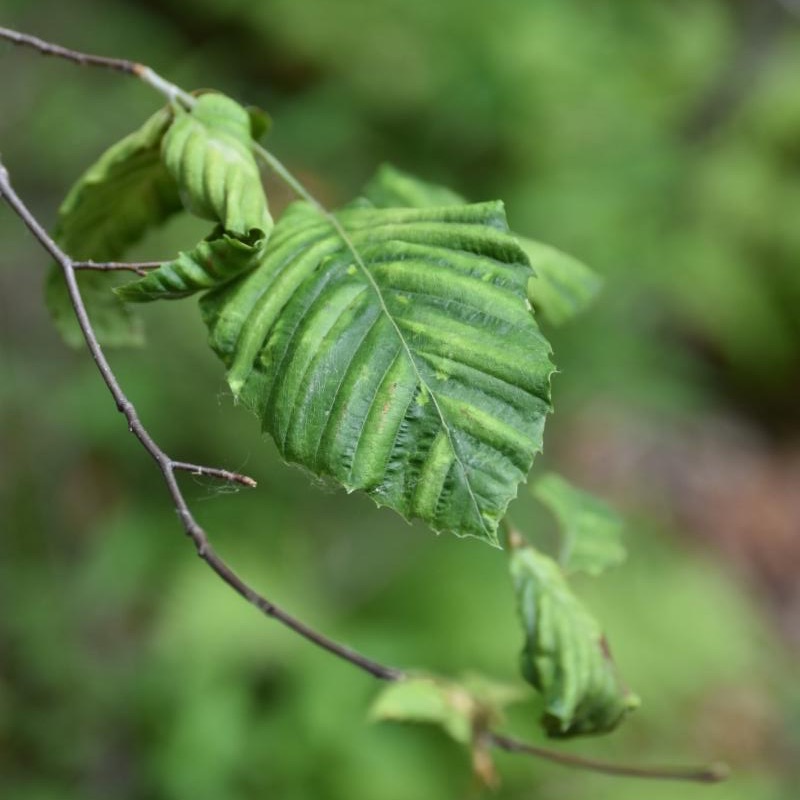
Fagus grandiflora infected with fatal Beech Leaf Disease
Photo courtesy of Dr. Dan Herms
|
|
A relatively new disease, called Beech Leaf Disease (BLD), is proving to be a mortal enemy of our beech forests. First discovered in Lake County in 2012, beech leaf disease has now migrated to at least 13 Ohio counties, 10 states and Ontario Province in Canada. BLD is caused by a foliar-feeding nematode, Litylenchus crenatae. Dr. Dan Herms, vice president of research and development for Davey Tree Expert Co. and former head of the Ohio State University entomology department, said it is not known how the nematodes spread and infect trees, although some research suggests they are vectored by birds. All species of beech (Fagus) are susceptible to BLD. An interesting note: BLD has spread largely east and north from the point at which it was discovered. Why it spreads in such a specific way is a topic for further research. Dr. Herms said BLD is yet another example of an invasive pest ravaging our hardwood forests, which have no evolutionary history with the nematode and thus have no defenses.
Symptoms include dark banding between veins in the leaf. BLD can make leaves appear distorted, thick and leathery, smaller than usual. Affected leaves often drop prematurely, causing the canopy to thin. The tree deteriorates and eventually dies. While mature trees take longer to show deterioration, once the disease is discovered the decline is inescapable.
There are no known treatments for BLD. Because no one knows exactly how the disease spreads, it is important not to move wood from one area to another. Some beeches exhibit resistance to the disease, leading scientists to begin efforts to develop replacements that can withstand the onslaught.
What makes BLD so concerning is that it is occurring along with Beech Bark Disease (BBD), another mortal enemy of beeches. BBD, known to researchers since the early '50's, is fortunately a slow spreader. Nonetheless it is a serious threat to the beech forest. Caused by a nectria fungus spread by a scale insect, Cryptococcus fagisuga, white patches on beech bark are one sign of infection. In more advanced cases, weeping cankers appear on the bark. Eventually the cankers join on the trunk, girdling the tree.
A third beech disease sounds more ominous than it is. Beech Blight is spread by wooly aphids that secrete honeydew, bringing a black, sooty mold to the leaves and branches. While the disease looks bad, it doesn’t seem to cause harm to the tree. Beech blight aphids have two unusual characteristics. Unlike other aphids, they will attack potential threats. And when disturbed, they dance. See for yourself HERE.
These beech diseases demonstrate how difficult it is to protect our keystone hardwood species from invasive pests and diseases. When you have a chance to walk through a beech forest, take a good look. Until a treatment is found, large stands of beech trees are not likely to remain, and can no longer be taken for granted.
S Vradenburg
|
|
A Dose of Sparkle and Shine |
|
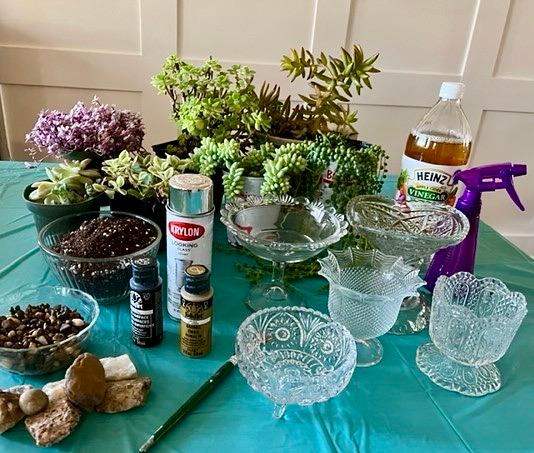
December’s short, dark days cry out for a bit of bling. Try your hand at these mercury-glass, succulent planters for a project that will brighten dreary days.
Create the faux mercury glass container.
Supplies :
-
Clear glass candy dishes, cruets, small pitchers, or other containers. Pressed and smooth glass pieces can be acquired for a song at resale shops.
- Krylon Looking Glass Silver spray paint
- Household vinegar and a spray bottle
-
Black and gold acrylic paints – the all-purpose or glass types are best – and brushes
- Make sure your container is squeaky clean. Set up a work area with papers or cardboard to catch overspray.
-
Spray light coats into the inside of your container (and on the bottom if the piece is stemmed), letting the paint dry slightly, about 1 minute, between coats. Heavy spray will cause runs. If running occurs, turn your container to coat the inside with the excess.
- Allow the paint to dry for 10 minutes – the finish lightens as it dries. Fill your spray bottle with a half water-half vinegar solution, set it so that coarse drops are emitted, and spray droplets on the silver paint. Let sit for about 20 seconds and then use a paper towel to dab at the drops and remove irregular portions of the paint. This creates a distressed look.
- Paint over the distressed areas with gold paint---leaving small bits bare.
- Paint the entire interior surface (and base bottom if the piece is stemmed) with your black acrylic paint and allow to dry.
You now have a container that has a mirror finish with black and gold distressed areas. HERE’S a tutorial on this process that will fill in the blanks.
Plant succulents in your mercury glass container.
Supplies:
-
Succulent plants or cuttings. Here’s where your stash of succulent plants, the ones that you brought in from your back porch, come in handy and save money (succulents can get pricey). To take cuttings, cut just above a leaf or branch to encourage new growth on the mother plant. Then cut the cutting just below a leaf. Cure the cuttings for two days out of direct sunlight to callous the cut edge and promote rooting.
-
Potting soil mixed with turkey grit, or other small stone shavings. This amended soil will drain faster and create the air spaces that succulent roots need. (You can also use a succulent potting mix, which has already been amended.)
-
Pea gravel or other small medium for a water collection area at the bottom of your container.
-
Stones, reindeer moss, or other embellishments if desired.
-
Floral pins if needed.
-
Here’s where we break one of the cardinal rules of planting containers. (There MUST be a drainage hole in containers so that roots get adequate oxygen.) Because we are rule breakers and have no drainage hole, we need to create a space in the bottom of the pot for excess water to collect. Place a layer of pea gravel or similar medium at the bottom of the container.
- Take a moment to arrange your succulents so that there is contrast of color and texture. It’s good to go into planting with a plan.
- Fill the container with the amended potting soil to the top and mound slightly. Raising the soil in the middle will create vertical interest and allow the plants in the center to shine.
- Plant your succulent plants and cuttings. If they are not secure place a floral pin or two between or through the leaves to secure them until they root into the potting mix.
- If desired, fill gaps with chartreuse reindeer moss, decorative stones, haydite (bonsai stone), or pea gravel.
If your mercury glass planter is a gift, share these care instructions with your recipient:
Place in a bright spot (direct sunlight is welcome but not necessary) and turn occasionally so that all sides receive light. Water sparingly when dry – and do allow the soil to dry out between waterings. Enjoy!
|
|
Supplies for a mercury-glass succulent planter. photo by K Edgington |
|
From Plan to Planted
Fourth in a series of four articles on the garden design and installation process.
|
|
1. An area that needed a landscape plan and planting. 2. Tools used to create the design. 3. The base drawing. 4. The finished design with plant selections. 5. After plant installation. 6. A rendering of the mature planting.
Images by K Edgington
|
|
At last! That garden bed imagined on a cold winter day is ready to be installed. You’ve done your research, created a design, selected and purchased plants, and it’s time to turn that vision into reality. But before putting shovel to ground:
- Call utilities and have them mark electric, gas, and cable lines in the area.
- Check local codes and regulations regarding fencing and hard features.
- Make sure that the area is graded for proper water run-off – away from buildings and structures and providing good drainage within the beds.
Creating raised or mounded beds in the landscape helps to promote good drainage and is an excellent way to showcase plants towards the center of the bed. I recently had an opportunity to tour premier gardens with the American Conifer Society and noted that each featured raised or mounded beds. Conifers and other plants sensitive to wet feet blended happily, and views of interior plants were more accessible. Beautiful! Because they drain more quickly, mounded beds require more irrigation, and that should be factored into the decision to create them.
After grading and bed elevation are complete it’s time to add any hard features (walks, lighting, watering systems, permanent seating). Putting those in place now will prevent disrupting newly planted beds.
A word about soils: The latest research shows that plants adapt more successfully and grow larger in the long run if they are planted in virgin soil, without the benefit of soil amendments. That’s tough for plant lovers to do – we want to add all sorts of goodies to enrich the soil and feed our plants. You can read about planting in native soils HERE. This holds true when the soil has been relatively undisturbed and soil microorganisms are at healthy levels. For disturbed or stripped soils, amendments are advised, and here’s where your soil test information is helpful. Amend your soils as indicated by the soil test laboratory before beginning your planting.
Begin planting with your focal point and large plants. Refer to the design and measure from corners and other reference points to determine the correct spot. Be accurate. You have already taken into account the mature size of the plant – don’t be tempted to plant closer together because of the immature size.
Use correct planting techniques. When planting trees and shrubs it is vital to know where the plant’s ROOT FLARE is (the area on the trunk where the roots begin to grow out horizontally). That area needs to be right below ground level. Too high, and the plant will dry out. Too low, and the plant will get insufficient oxygen. Do not assume that the root flare is right under the soil surface in the pot or B&B (balled-and-burlapped plant). More often than not, the plant is planted too deeply in the container. You must remove planting medium and look. HERE’s more information about correct planting depth. When you have identified the plant’s root flare, measure from above the root flare to the bottom of the root ball and dig a hole to that depth and two to three times the width of the root ball. Current research suggests that it is best to plant the tree or shrub slightly above ground level to allow for settling after watering.
After digging your hole, loosen roots on the perimeter of the ball, cut or untangle any encircling roots, and place the plant in the planting hole. Fill the hole with water, allow it to drain, and then backfill with your soil. Water again to settle the soil and moisten the top layer.
After planting your major and supporting plants, work your way through the area until all plants are in the ground. Finish your planting with a two to three inch layer of mulch to conserve moisture and discourage weeds. Keep the mulch away from plant trunks, where it can trap moisture and foster disease. Using a mulch that must be replenished annually is a good thing – the decomposing mulch feeds soil microorganisms necessary for plant health. Pine bark and pine needles are excellent choices. Make sure that each of the plants has had a good drink. Done!
Newly installed plants will need more care for the first year as roots develop. HERE is some information about the watering frequency for newly planted trees and shrubs, but do temper that info with your knowledge of rain levels in your area.
What a change! We started by asking lots of questions, got out our ruler and pencil and created a design, chose plants to enhance our plan, and planted each of them as the design directed. The best part is yet to come: watching that garden bed or landscape grow, seeing the plants interweave and the colors and textures play off each other – just as we imagined!
K Edgington
|
|
December Checklist:
- Take advantage of a sunny day to complete fall cleanup.
- Remove spent plants from outdoor pots and store, or create an inviting patio pot with found items.
- Consider houseplants or memberships to local botanical gardens and nature centers for holiday gifts.
- Stock up on birdseed and suet for winter entertainment.
- Get ready for next year by making notes on what worked/didn’t work in your yard this year.
- Sit by the fire, relax and count your blessings.
J Gramlich
|
|
More learning opportunities:
|
|
On the first day of winter the earth awakens to the cold touch of itself. Snow knows no other recourse except this falling, this sudden letting go over the small gnomed bushes, all the emptying trees. Snow puts beauty back into the withered and malnourished, into the death-wish of nature and the deliberate way winter insists on nothing less than deference. Waiting all its life, snow says, "Let me cover you".
Laura Lush, The First Day of Winter
|
|
We invite you to share The Root of It with your gardening friends and family. If you would like to subscribe to our mailing list please visit our website, scroll to the bottom, and follow the link under Join our email list. |
|
The Root of It staff: Karen Edgington (Editor), Emma Barth-Elias (Photo Editor), Carolyn Christian, Jennifer Gramlich, Sarah Vradenburg, and Geoff Kennedy (Technical Advisor)
|
|
We Would Like your Feedback
Contact us at: newsletterscmg@gmail.com
To discontinue receiving this newsletter please click on the UPDATE YOUR PROFILE link below. You may then choose what types of information you would like to receive from us.
|
|
|
|
|
|
|