February gardening: walks to enjoy, observe, and take notes interspersed with armchair forays into gardening mags, catalogs, and books. Savor each day! |
|
The Root of It newsletter ends with our monthly quotation. If you find your newsletter has been clipped by your email provider please click HERE for a webpage version of the newsletter. |
|
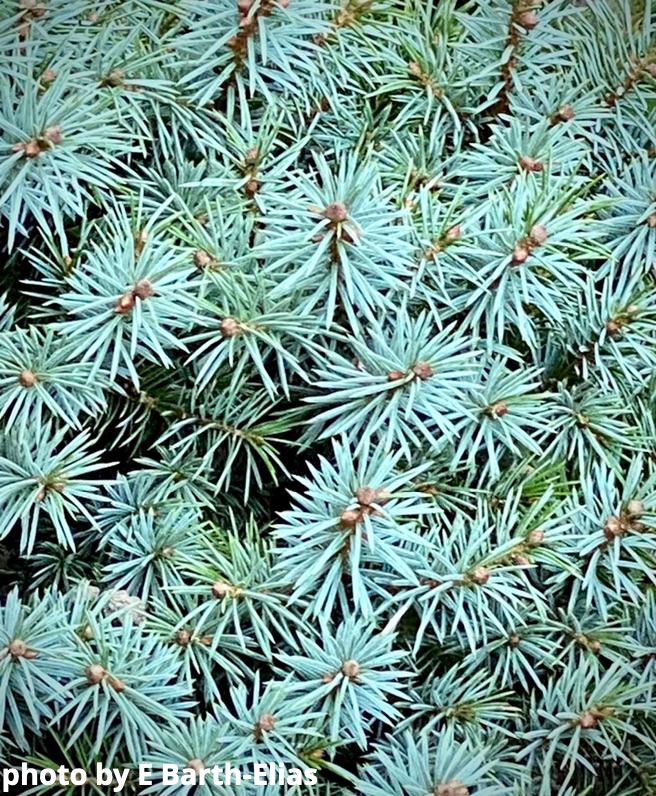
What would our winter look like without the greens and blues of evergreen trees? Their colors and textures light up the landscape, but how do they survive frigid winter temperatures? Why do most conifers (cone-bearing plants) keep their leaves when their deciduous cousins have shed theirs?
Being some of the oldest trees in the world, evergreen conifers (spruce, pine, yew, etc.) have leaves that are adapted to harsh environments. Because soils in those environments can be lean or dry, these conifers have the ability to photosynthesize or generate food year-round. Although their shape is less efficient than a flat, deciduous leaf, the sheer number and mass of their needles create a large area that is exposed to the sun. A waxy coating on the needles, called cutin, keeps moisture in, but how does the water in those needle cells keep from freezing? Evergreen conifers produce substances called cryoprotectants that act as an antifreeze by lowering the freezing point of water in their cells. Some also transfer water out of needle cells into the spaces between to prevent freeze damage.
The energy expended by a tree to make a flat, deciduous tree leaf, a maple or an oak for example, is recouped by the carbohydrate made in that leaf in one growing season. With evergreen conifers, the photosynthetic product might be less per leaf, but the rewards come over multiple seasons. The balance sheet favors evergreen needles for trees that live in challenging environments and need more than one growing season to recover the energy costs of leaf making.
All trees shed their leaves and produce new ones. Leaf shedding in deciduous conifers occurs after varying lengths of time. While pines keep their needles two to seven years, depending on the species, spruce, juniper, and Douglas fir needles may persist for ten years. Bristlecone pines living in high elevations can retain individual needles for almost fifty years.
Evergreen conifers can be found on every continent except Antarctica, and their forests cover approximately 15% of the earth’s surface. They have also naturalized in our forests and happily grow in our parks and landscapes, where we are refreshed by their green beauty on stark winter days. Look Around.
Learn More about conifer needles HERE
K Edgington
|
|
Leaf Brief - African Violet |
|
No one ever said gardening was
easy, but sometimes you just want the reward without all of the hassle, the drama, and the disappointment. Consider an African violet. Its payoff is nearly continuous bold blooms with a minimum of fuss.
A native of East Africa, African violets (Saintpaulia ionantha) are a mainstay of the house plant enthusiast for good reason. Most varieties are under 8 inches in height and stay that way with minimal repotting or pruning. Keep them in a bright window and meet their basic requirements and you should be good to go.
For those who aren’t happy with just foliage, African violets deliver with blooms in a variety of bold colors such as white, pink, maroon, violet, lavender and dark purple, (some with two colors) and contrasting yellow centers. They form a nice rounded mound and dead flowers are easily pinched to keep them tidy.
That said, this is a live plant so you must do a few things to keep it sustained. Bright light is ideal for growing African violets. Northern or eastern exposures work well because direct sun can scorch the leaves. Fourteen to 16 hours of light and 8 to 10 hours of darkness daily are necessary to produce blooms. In the winter, natural light can be supplemented (or replaced) with LED or grow lights, or you can just wait until nature takes over closer to spring.
Optimal temperatures for growing African violets range from 60 to 80 degrees so if you’re happy they’re happy. Humidity between 40-60% is ideal. If your house is dry you can set the pot on a tray of pebbles with water to create a moist micro-climate. The plants can easily be propagated from leaf cuttings but small plants are economically priced and are easily found at garden centers and online. Here's HOW TO PROPAGATE AN AFRICAN VIOLET. Seeds are another option but the offspring might not look like the parent plants.
Watering is usually what trips up African violet owners. The soil should be kept moist but not soggy. Root rot or crown rot is the number one cause of death and is preventable. Water the soil with a narrow-spouted container avoiding the leaves which can develop water spots if left wet. Plants can also be watered from the bottom by soaking them for a few minutes in about an inch of water. Self-watering pots will also work. Fertilizers specifically formulated for African violets, typically higher in phosphorus to encourage blooms, are readily available. A well-balanced fertilizer of 10-10-10 or 20-20-20 would also be appropriate.
If you think that African violets might be a bit on the old-fashioned side, then you don’t know that there are several thousand varieties with more being added all the time, including flowers that are single, double, semi-double, star-shaped, fringed, or ruffled. Trailing varieties can be grown in hanging baskets or even as ground covers in warmer climates. Miniatures, less than 6” in diameter, and micro-miniatures, less than 3”, are adorable with cultivar names like Munchkin Kisses and Bunny Bop. Other varieties grow over 16” tall. Their color range now includes chartreuse and pale pinks. The Russians and Ukrainians are leaders in producing new hybrids that are becoming popular with collectors in the United States. African violets have long been a favorite of collectors, spawning African violet clubs, shows, and even conventions. Check out the AFRICAN VIOLET SOCIETY OF AMERICA. Ohio has an active club with regional events. Even if you’re not involved to that level, an African violet can brighten a dreary day and makes a great gift for Easter, Mother’s Day, or perhaps a housewarming.
Learn more about African violets from the Minnesota State Extension HERE.
J Gramlich
|
|
Organic Fertilizers - All they're cracked up to be? |
|
When we go to the grocery store, the word organic occupies many shelves and coolers. To the consumer it means the product was grown with only “organic” inputs. As gardeners, organic tends to mean we don’t use synthetic fertilizers or pesticides. To a chemist organic simply means that the compound contains carbon. To many people, organic means safe and wholesome.
As we are now learning, organic doesn’t necessarily mean the item is totally safe.
The nursery, mail-order company or big box store attaches a variety of terms to the fertilizers they sell. The most common are organic, synthetic, natural or chemical. What do they mean? Which is best? Let’s first explore the terms themselves.
Pennsylvania Master Gardener Nancy Knauss suggests the term synthetic should be replaced by the term inorganic. Inorganic fertilizers simply indicate that the formula used to create the fertilizer does not contain carbon.
What to make of natural? By now, most of us know that natural as a descriptor is too vague to be helpful, whether talking about food or fertilizer. Even inorganic fertilizers can be made from naturally occurring materials. Natural doesn’t necessarily mean better; it’s simply a marketing term.
Finally, what does chemical mean? Again, it’s not a helpful designation. Everything in nature is crafted from chemicals, whether it is a nutrient we add, a micronutrient in the soil, the sap dripping from a milkweed plant or the hand that tends the garden. We determine which chemicals we put in our gardens in the form of mulch and compost, organic or inorganic fertilizers.
According to Ross Penhallegon, horticulturist with Oregon State University Extension Service, organic fertilizers are not manufactured but are derived completely from plant or animal sources. Is there any advantage to using organic fertilizers such as blood meal or urea for nitrogen? Penhallegon says that the most obvious advantages are their ability to improve soil structure, contribute to the food web, help move water, create air spaces and feed microbes.
Penhallegon says inorganic fertilizers have the advantage of being readily available to plants, particularly compounds that contain nitrogen. However, those ingredients move quickly through the soil and must be reapplied regularly throughout the growing season unless used in a time-release form. Inorganics, even those made from naturally occurring materials, do not improve soil. They often create a crust around the plants and need to be cultivated throughout the growing season.
Organic matter adds the same nutrients as inorganics to the soil but at a much slower pace. Indeed, some organic fertilizers need to be converted into inorganics, which is done by soil microbes, before they can be used by plants. Inorganics are quickly broken down by water and need to be reapplied regularly. According to the University of Minnesota, excess reapplication causes the plants to take up more nutrients than they can use. This buildup dehydrates the plants, and flushes needed nutrients from plant tissues. Fresh manure can do the same and therefore needs to be composted before it is applied to the soil.
The use of organic fertilizers helps soil structure and bolsters plant fertilization in a process that has existed for millennia. Inorganics offer a quick shot when needed, but they don’t contribute to healthy soils.
When it comes to feeding our plants, we need to understand what they need and then find the material that helps them become the healthy, beautiful plants we strive for.
S Vradenburg
|
|
Dear Reader, the following was found in my email from an uninvited guest.....
A message from a White-Tailed Deer
SHHHH. If anybody sees me I’m TOAST. I peeked in the window just as she dozed off at her computer, and the back door was unlocked! FINALLY a chance to tell our side of the story!
We feel very unloved. We are beautiful, graceful animals, yet you shoot us with guns and bows and arrows, drive into us with cars, and spray smelly stuff on our food. You use the word “buck” to mean dollar—did you know that came from your ancestors trading our skins for goods? Ugh! Why don’t you see us for the amazing animals we Odocoileus virginianus are?
Hard to believe now, but we were declared extinct in Ohio in 1909, thanks to overly enthusiastic hunters and unchecked deforestation. Fellow ungulates, the elk and American bison, never returned but we did, as hunters realized regulation was needed if their fun was to continue (duh!) and habitats grew back—plus we adapted nicely to urban areas without hunters and predators! There are now around 700,000 of us in Ohio, and we are the official state mammal. How’s that for tenacity?
And we’re SO cute! Bambi is the gold standard for cuteness – watch THIS and try not to go “Awww”. And those spots aren’t just for looks. Our babies can’t run from predators, so they drop to the ground when threatened, and the spots (300 or so) help them “disappear” among the dappled sunlight of the forest. (Fawns have very little scent. Does lick babies clean after birth, then stay away except to nurse and lead them to new bedding sites, so the doe’s scent won’t attract predators to the fawns.)
Babies lose those cute dots by 4 months, but our adult coats are beautiful and functional, changing from a short, wiry reddish tan in warm months to a heavy, longer grey/blue tan that provides astonishing insulation in winter. However, you may only spot our raised white tail signaling danger as we leap away, reaching speeds up to 35 mph. We can jump 9 feet but my friend shown HERE might have set a new record!
We have excellent hearing, and our wide-set eyes provide a 310° range of vision. Only bucks grow antlers, which serve as weapons and to attract the ladies. Antlers are some of the fastest growing tissue in any mammal—we grow new ones every year at up to ¼ inch per day! Antlers sprout in spring, and are covered in velvet, a fuzzy skin laden with nerves and blood vessels that nourish growth. Antlers harden to bone by fall before mating season and are shed thereafter, and the process begins again.
You’ve probably noticed that we're social and live in herds. Does and fawns herd together, and 3-5 bucks will form a herd that changes as we fight for dominance. Males leave their herds at mating season, but in winter males and females may herd together for protection from predators and warmth. And, yes, there are a lot of us. As “prey” animals we have a high reproductive rate. You eliminated our predators such as the wolf and cougar, and coyotes generally go for smaller prey, so our population grows!
Mating season (“rutting”) takes place from mid-October to December, and busy bucks have multiple partners. Rutting involves bucks chasing does, sparring with other males, and sometimes full-on battles like THIS ONE. We can be aggressive and unpredictable when in rut—encounters with you humans may not end well. FOR EXAMPLE...
Does give birth mid-May to July, will have 1-3 fawns, and nurse for about 10 weeks. They are very protective moms, as THIS shows.
Deer can have loving relationships with humans. Dr. Melanie Butera, an OSU-trained vet in Canal Fulton, rescued a blind fawn abandoned at birth, and Dillie the deer became a part of her family, an internet and webcam star, and the subject of a book. Dr. Butera credits Dillie with saving her life when she was diagnosed with stage 4 cancer. Watch THIS and check out dilliedeer.com (as of 2021 both Dillie and Dr. Butera were doing well.)
Let’s get to the elephant in the room…your negativity about us probably has to do with our feeding habits. We are non-picky herbivores, but we eat a LOT (and you can always tell it’s us by the raggedy-edges—with no upper front teeth we can’t make a clean cut.) At a svelte 150 pounds I need 9-12 pounds of leaves, twigs, acorns, stems, flowers, fruits, etc. every day. A professor at the Mississippi State University Deer Lab made THIS video to illustrate just how much that is. We generally graze at dawn and dusk, pausing when our stomachs are full to digest. (As ruminants we regurgitate our food and re-chew it.) We usually stay within a square-mile territory and stick to our established paths, which honestly might be through your garden. Given a choice, we don’t like hairy, fuzzy, prickly or highly scented plants, but if we’re hungry enough all bets are off.
But there is one way to keep us from eating your tasty plants, and that is…
AAYIEEE! She’s awake! Gotta go! Remember, deer is NOT a four-letter word!!!
(Dear Reader: The following gives a slightly different perspective from our deer friend’s views: ARE THERE TOO MANY DEER? by the Cuyahoga National Park System )
C Christian
|
|
I don’t know about you, but I find succulents endlessly delightful! Their geometrics are often beautifully symmetrical, like a sweet echeveria rosette, or outrageously stacked, like the fat little segments of a Crassula x perforata. And oh, the colors! Variegations abound and the nuance and subtleties of winter coloration in some varieties explode into vibrant hues once the seasons change and we return these friends to the outdoors where they drink in summer sunshine all day. As gardeners we are mindful of the importance of varying size and textures in our designs— so, thankfully, there are grand spiky mangave as well as fuzzy little kalanchoes, while some haworthia display a generous spattering of tiny raised white dots.
One way to ensure that we will have plenty of these gems to add interest to our outdoor space this summer is to propagate our own little inventory of pups (baby succulents.) It is satisfying, fun and practically free if you have a few plants already. If we begin right now, we can easily multiply some of our favorites in time to enjoy this summer.
There are several ways to propagate succulents, but here we will explore my favorite, leaf propagation. This method is simple and offers a high success rate in addition to the opportunity to watch the emergence of a tiny, chubby, replica of the mother plant.
Choose plants: For best results use plump, water filled varieties such as sedums, echeveria, graptoveria, and kalanchoe.
Choose leaves: Select healthy, fully hydrated, mature leaves located toward the base of the plant. You may wish to start with a plant which has a generous number of leaves available.
To Plant:
- Remove a leaf using a gentle twisting motion. The ideal candidate will include a small amount of stem tissue. (These meristematic cells divide super quickly which encourages the speedy initiation of offspring.)
- Allow the wound to dry and callous over at room temperature for at least 24 hours.
- Place leaves on a tray with a layer of succulent soil mix or any well-draining mix (less than 1 inch.)
- Water the soil under the leaf (not the leaf itself) using a pointed or precise delivery device such as a dropper, syringe or narrow tipped squirt bottle.
- Place the tray in a medium bright location away from direct sunlight.
- Exercise patience! You will notice tiny roots emerge within a few weeks. The exact time depends on the species and environmental factors such as humidity (more humidity promotes faster development.)
- Continue watering around roots when the soil is dry.
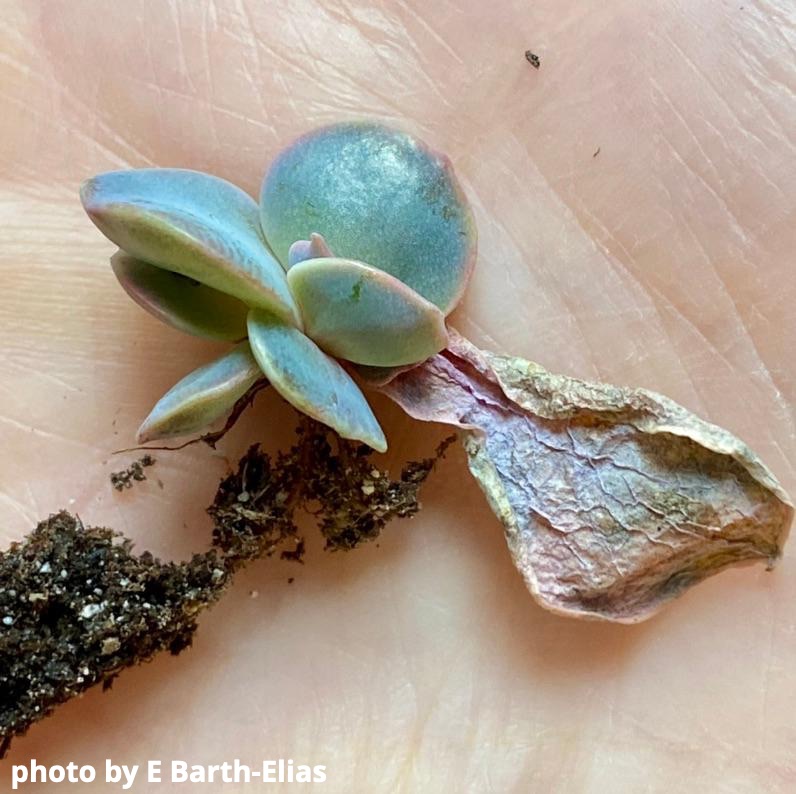
- Within a few more weeks you will be able to see a tiny plant emerging at the base of the leaf cutting. New pups require more water than mature plants, so don’t stop now!
- Once the pup is sufficiently formed and sturdy enough, it is ready to be planted in its own pot. The mother leaf will shrivel and dry up as life is transferred to its pup. It can be carefully removed if necessary to fit the pup in its new pot.
- Select a container with drainage holes.
- Plant in a well-draining, gritty succulent planting mix or make your own from equal parts of good quality potting soil and a granular material such as chicken grit, coarse sand or perlite.
- Begin to acclimate your new plant to a sunny window or grow-light location.
What a thrill to grow your own succulent pups! Plus, you have the added pleasure of increasing your stock to share and enjoy.
E Barth-Elias
|
|
Indoor Gardening – Creating a Tray Garden |
|
Being an enthusiastic gardener, I am constantly on the lookout for new and different containers. An old shoe, a vintage tin, a soup tureen, the hollow of a piece of driftwood – being creative with containers makes the planting even more fun and the viewing interesting. My current favorite container gardening features vintage trays.
When creating a tray garden, trays with raised edges work best. Footed or raised trays add elegance, a bit of height, and make drainage more efficient. Feet can be added to a flat tray by gluing beads to the corners or periphery of your tray bottom, using a strong glue such as E6000. As with all container gardening, follow rule number one: your container must have drainage. This means getting out your drill and making one or more drainage holes in the bottom of the tray.
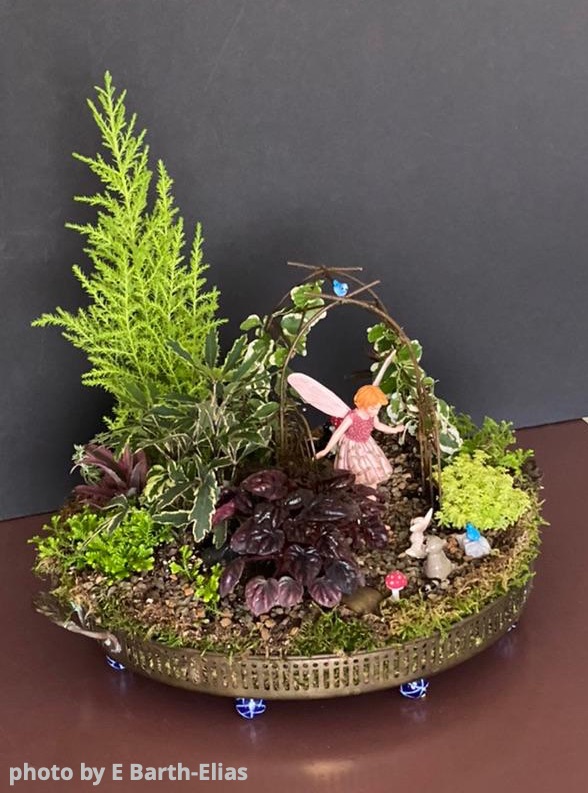
Small tropical plants (houseplants) combine beautifully in a tray garden, but why not have some fun and create a landscape with miniature plants? These gardens are interesting, engaging and have just enough maintenance to satisfy the gardener in you. Most good nurseries have a selection of small plants for terrariums or fairy gardens, as do online purveyors. Here’s how to create your miniature landscape on a tray:
Materials:
- Tray of any size, but make sure you have the indoor real estate for the larger trays. The tray must have drainage holes drilled in the bottom – from 1 to 3 depending on the size of the holes and of the tray.
- Small pieces of coffee filter, hardware cloth, or screen if your holes are larger than ¼”
- Good potting soil – NO fertilizers or polymer (water absorbing) crystals in the mix
- Sheet moss to raise the sides (available at craft stores)
- Strips of plastic slightly narrower than the strips of moss you will cut. The plastic will sit between the moss and soil, and acts as a moisture barrier, retaining moisture in the soil.
- An assortment of miniature plants. Choose plants that have contrasting textures, sizes, and colors and the same light and water requirements. (You can pop a succulent plant in with your tropicals if you adjust your watering in the succulent area.)
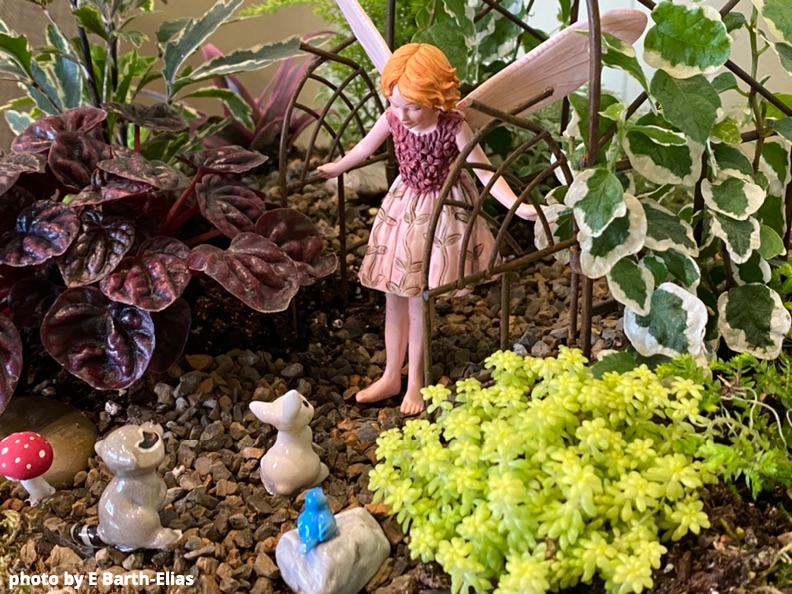
- Interesting rocks, figures (human, animal, or both), shells, miniature gates and bridges, and other objects to create drama. Small figures will be more stable if a nail is glued to the bottom, using a strong glue such as E6000.
- Blue chipped glass and flat marbles if you want to create a faux water feature in your tray garden
- Haydite (a bonsai material), pea gravel, chicken scratch (feed store), or other chipped stone material for top dressing.
Now, let the fun begin:
- Place your coffee filter, screen, or hardware cloth over the holes in the tray.
- Briefly soak the sheet moss in water and wring it out. Cut and position strips of the damp moss against the tray sides, with the green side out, going an inch and a half or so higher than the tray bottom.
- Place strips of plastic inside the moss (towards the center of the tray) and immediately fill in the center of the tray with soil up to the top of the moss and plastic. Your plastic strips should not show, but if they do they can be cut down after your planting is finished.
- Vary the height of the soil above the moss height by adding mounds to create vertical interest and to create the vignette that you have imagined.
- Make a plan: Arrange your plants on the tray. Here’s where you create a miniature landscape with water (pond or stream), paths, boulders (your interesting rocks) and other features. A large shell or a flat stone turned vertically can help you create a high ridge with a low area below.
- First insert your rocks or shells and then plant your plants. Trim plants to create the shape and size that you want. A lemon cypress can be “limbed up” up to imitate a tree. Variegated creeping fig can climb up trellises or over arches. Dwarf baby’s tears become a ground cover.
- After the plants are in, create your water feature if you are including one. Put flat marbles into the depression you have created for the feature and top with chipped glass. This is done last to keep other material out of the faux water area.
- Top dress all bare soil with a layer of crushed stone or haydite to retain moisture and created a pleasing finish.
- Insert your figures.
- Trim off any plastic that shows above the soil surface.
- Water well (until water comes out of your drainage holes) and water when dry thereafter. (You can determine the moisture level by the tray weight or scratch beneath your topdressing to assess.)
Place your tray garden in a bright spot and enjoy. A saucer placed inconspicuously underneath the tray can catch excess water or remove to a sink area when watering. Occasional trimming will keep plants in proportion.
|
|
One of the plants not happy or not “just right”? Simply remove. We call that an "opportunity spot", and a good reason to head to the garden center.
These tray gardens are charming indoors, but also lovely on a patio table or stand outside when weather allows. And what a treat to show up at the door of a friend with a small tray garden in hand!
K Edgington
|
|
|
February Checklist
-
Begin dormant pruning to shape and control overgrown trees and shrubs. PRUNING TREES AND SHRUBS
- Order your annual and vegetable seeds now for summer.
- Take stock of your equipment for seed starting such as lights, heat mat and sterile medium.
- Keep an eye out for perennials that have heaved out of the ground and replant if possible.
- Start indoor seeds for cool-season vegetables like broccoli, cabbage, kale and onion.
- Start long-germinating seeds like rosemary, snapdragon and begonia.
- Fertilize houseplants, rotate toward the light and keep checking for critters.
J Gramlich
|
|
To learn more please check out these programs :
Meet Me in the Garden Series:
-
Dazzling Dahlias with OSU Extension Educator Jacqueline Kowalski on Wednesday, February 23rd at 7:00 pm. (Zoom)
-
Seed Starting: Tried-and-True as Well as New Approaches with Summit County Master Gardener Vince Matlock on Wednesday, March 23rd at 7:00 pm (Zoom)
_______________________________
IT'S BACK!
The Summit County Master Gardener Saturday Gardening Series
Saturday, March 5th, from 9:00 a.m. through 4:00 pm
At the Summit County OSU Extension (in the Akron Urban League Building)
440 Vernon Odom Blvd, Akron 44307
Featuring:
Allen Chartier, founder of the Great Lakes HummerNet, and his program entitled The Great Lakes HummerNet, which details attracting, feeding, and gardening for hummingbirds.
Lee Paulson, Summit County Master Gardener, talking about Bulbs Through the Seasons with info about their impact on history, economics, art, literature, poetry, and even romance.
Cynthia Druckenbrod, past Vice President of Horticulture at the Cleveland Botanic Garden, presenting Autumn Brilliance in Your Garden, and how to get the WOW factor in your autumn garden.
Phyllis Mihalik, owner of PM Consulting and a Geaga County Master Gardener, and her program Why We Grow What We Grow, a look at the foods we grow and the history of the food aisle.
Visit our website to register.
Learn more about and register for these programs on our website (link below).
|
|
More learning opportunities:
|
|
He knows no winter, he who loves the soil,
For, stormy days, when he is free from toil,
He plans his summer crops, selects his seeds
From bright-paged catalogues for garden needs.
When looking out upon frost-silvered fields,
He visualizes autumn's golden yields;
He sees in snow and sleet and icy rain
Precious moisture for his early grain;
He hears spring-heralds in the storm's ' turmoil
He knows no winter, he who loves the soil.
Sudie Stuart Hager, He Knows No Winter
|
|
We invite you to share The Root of It with your gardening friends and family. If you would like to subscribe to our mailing list please visit our website, scroll to the bottom, and follow the link under Join our email list. |
|
The Root of It staff: Karen Edgington (Editor), Emma Barth-Elias (Photo Editor), Carolyn Christian, Jennifer Gramlich, Sarah Vradenburg, and Geoff Kennedy (Technical Advisor)
|
|
We Would Like your Feedback
Contact us at: newsletterscmg@gmail.com
To discontinue receiving this newsletter please click on the UPDATE YOUR PROFILE link below. You may then choose what types of information you would like to receive from us.
|
|
|
|
|
|
|